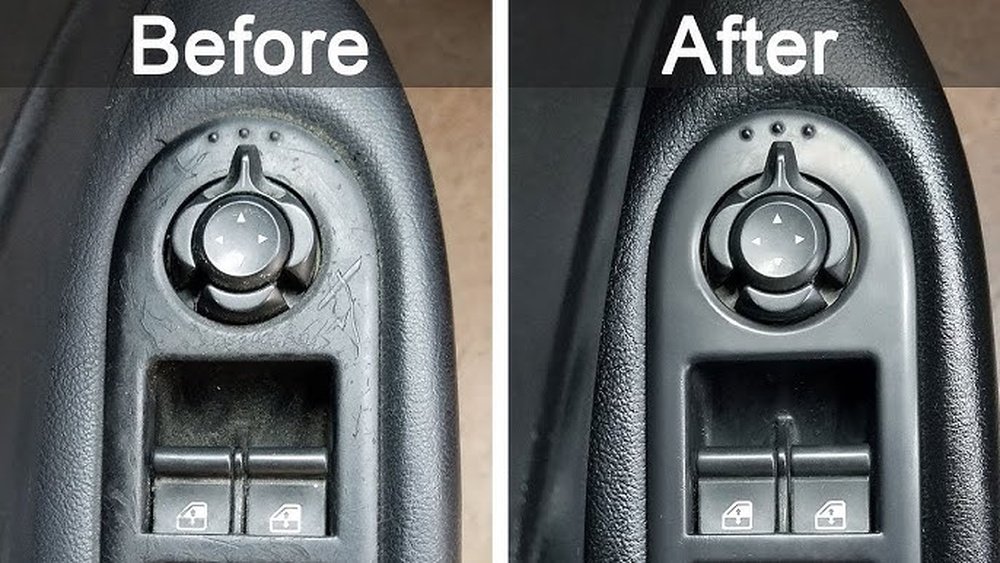
Have you ever noticed how sticky or unresponsive your car window buttons can get over time? Dirt, dust, and grime build-up can make them frustrating to use and even damage the controls.
But don’t worry—you can fix this quickly and easily. In this guide, you’ll learn simple steps to clean your car window buttons, restore their smooth function, and keep your car’s interior looking fresh. Keep reading, and you’ll discover practical tips that save you time and money while making your daily drive more comfortable.
Tools Needed
Cleaning car window buttons is easy with the right tools. Using proper tools makes the job faster and better. You avoid damage and get a neat finish. Prepare these tools before you start to clean.
Cleaning Solutions
Choose a mild cleaning solution for the buttons. A mix of water and gentle soap works well. Avoid strong chemicals that can harm plastic parts. Isopropyl alcohol is good for tough grime. Use it sparingly to prevent damage.
Brushes And Cloths
Soft brushes help remove dirt from small spaces. A clean toothbrush is a perfect tool. Use microfiber cloths to wipe the buttons. They are gentle and absorb dirt well. Avoid rough cloths that might scratch the surface.
Additional Supplies
Cotton swabs help reach tight corners around buttons. Toothpicks can remove stubborn dirt carefully. A small vacuum cleaner can suck loose dust. Keep a bowl of clean water nearby for rinsing. Use gloves to protect your hands during cleaning.

Credit: www.the-sun.com
Prepare The Area
Preparing the area before cleaning car window buttons is important. It helps avoid damage and makes cleaning easier. Follow simple steps to get ready.
Turn Off The Car
Always turn off the car before cleaning the buttons. This stops any electrical problems or accidents. Removing the key or pressing the power button off is best. Wait a few minutes to let the system shut down fully.
Protect Surrounding Surfaces
Cover nearby areas like the door panel and seats. Use a soft cloth or plastic wrap to keep them safe from cleaning liquids. This prevents stains and water damage. Avoid harsh chemicals that can harm the car’s interior.
Remove Loose Dirt
Removing loose dirt from car window buttons is the first step to clean them properly. Dirt and dust can gather around and inside the buttons. This makes the buttons sticky or hard to press. Cleaning loose dirt keeps the buttons working smoothly and looks better.
Dusting The Buttons
Use a soft brush or a microfiber cloth to dust the buttons. Gently brush around each button to remove loose dirt. Avoid using too much pressure to prevent damage. Dusting helps clear away dirt on the surface and edges.
Work slowly and cover all buttons. Clean every corner to remove hidden dust. This step prepares the buttons for deeper cleaning later.
Using Compressed Air
Compressed air is great to blow out dirt from tight spaces. Hold the can upright and spray short bursts around the buttons. This pushes dirt out from hard-to-reach places inside the button gaps.
Keep the nozzle a few inches away from the buttons. Avoid spraying too close to prevent moisture buildup. This method cleans dirt that brushing cannot reach.
Credit: www.breakerlink.com
Clean The Buttons
Cleaning the car window buttons keeps them working well and looking neat. Dirt and grime build up quickly around these buttons. Regular cleaning stops sticky residue and dust from causing problems. It also improves the overall feel of your car’s interior.
Applying Cleaning Solution
Choose a mild cleaning solution like diluted dish soap or a gentle all-purpose cleaner. Lightly dampen a soft cloth or cotton swab with the solution. Avoid soaking the buttons to prevent moisture damage. Carefully apply the cleaner around and on the buttons’ surface.
Scrubbing Gently
Use a soft-bristled brush or a clean toothbrush. Gently scrub around the edges and between the buttons. This removes dirt trapped in small spaces. Take your time and be gentle to avoid damaging the buttons.
Wiping Excess Moisture
Use a dry microfiber cloth to wipe away excess moisture. Make sure no water remains on or inside the buttons. This prevents electrical issues and stops dirt from sticking again. Let the area dry completely before using the buttons.
Clean Around The Buttons
Dirt gathers quickly around car window buttons. Use a soft brush or cloth with mild cleaner to remove dust and grime. Keep buttons dry to avoid damage and ensure smooth operation.
Reaching Tight Spaces
Dirt and dust gather in small gaps around car window buttons. These spots are hard to reach with a cloth. Use a thin tool like a soft brush or a toothpick to clean these tight spaces. Move gently to avoid damage. This helps remove grime stuck in crevices and keeps buttons working smoothly.
Using Cotton Swabs
Cotton swabs are perfect for detailed cleaning. Dip a swab in a little rubbing alcohol or mild cleaner. Wipe carefully around each button’s edges and corners. Change swabs often to avoid spreading dirt. This method cleans stubborn dirt without harming the button surface.
Dry And Test
After cleaning your car window buttons, the next important step is to dry and test them. This step prevents damage and ensures the buttons work correctly. Moisture can cause electrical issues, so thorough drying is essential. Testing confirms the cleaning did not affect functionality.
Ensuring Complete Dryness
Use a soft cloth to wipe away any moisture. Let the buttons air dry for at least 15 minutes. Avoid pressing the buttons during this time. This allows any trapped water to evaporate. Use a fan or gentle airflow to speed drying if needed. Never use heat sources like hair dryers, as they can damage the plastic.
Testing Button Functionality
Once dry, press each window button several times. Check if they respond smoothly without sticking. Test all windows to confirm each button works. If a button feels sticky or unresponsive, repeat cleaning or drying. Proper testing ensures safe and reliable use of your car windows.
Maintenance Tips
Maintaining your car window buttons keeps them working well and looking clean. Dirt and dust can build up quickly, causing buttons to stick or fail. Simple care steps help avoid costly repairs.
Regular Cleaning Schedule
Clean the buttons at least once a week. Use a soft cloth slightly dampened with water. Gently wipe around each button to remove dust and grime. Avoid spraying water directly on the buttons. This prevents moisture from entering the electrical parts.
Avoiding Common Mistakes
Never use harsh chemicals or abrasive materials. These can damage the button surface and nearby plastic. Avoid pressing buttons too hard during cleaning. Excessive force may cause the buttons to break. Keep liquids away from the control panel. Moisture can cause electrical problems or corrosion.

Credit: www.youtube.com
Frequently Asked Questions
How Often Should I Clean Car Window Buttons?
Clean car window buttons every 1-2 months. Regular cleaning prevents dirt buildup and ensures smooth operation. Frequent use exposes buttons to dust and grime, so timely cleaning maintains their functionality and appearance.
What Tools Are Best For Cleaning Window Buttons?
Use a soft microfiber cloth, cotton swabs, and a small brush. These tools help reach tight spaces gently without damaging buttons. Avoid abrasive materials to prevent scratches or button malfunctions.
Can I Use Water To Clean Car Window Buttons?
Use minimal water with a damp cloth, never soak buttons. Excess moisture can cause electrical issues. Opt for a mild cleaning solution designed for electronics or car interiors for safe cleaning.
How Do I Remove Sticky Residue From Window Buttons?
Apply a small amount of isopropyl alcohol on a cotton swab. Gently rub the residue until it lifts. Avoid harsh chemicals to prevent damage to button surfaces and electrical components.
Conclusion
Cleaning car window buttons keeps them working well and looking nice. Dirt and dust can cause buttons to stick or stop working. A little care goes a long way. Use soft cloths and gentle cleaners for best results. Regular cleaning prevents damage and saves repair costs.
Keep your car interior fresh and neat with simple steps. Clean buttons make driving more comfortable and safe. Small habits make a big difference. Try these tips today for a cleaner car.
Leave a Reply